User Guide
This chapter describes how to manage the camera parameters.ay
The standard way to manage parameters is via camera configuration dialog. Alternatively, almost all parameters can be set via Python interface. In addition, python script can be used to issue camera commands.
Camera Configuration Dialog
Camera properties dialog can be used for an opened camera.
Note
If a camera fails to open with No permission error: the driver only runs Scorpion GigE and USB cameras.
An example of camera configuration dialog:
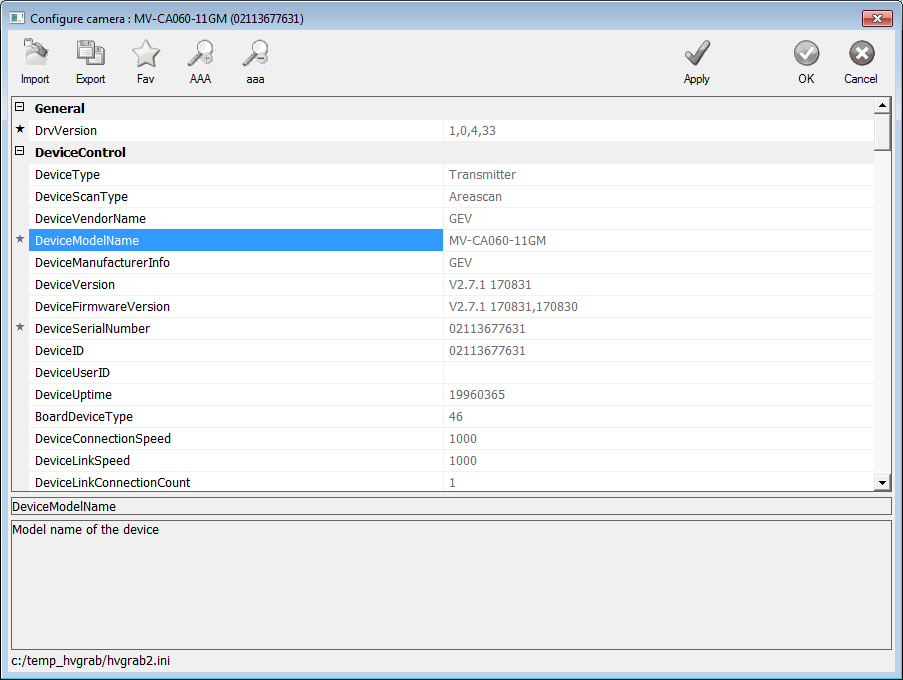
Read-Only values will appear grayed.
Apply writes properties to camera and then reads them back. It verifies that a property is accepted by the camera or not. Some values like Width, Height, etc, cannot be changed by Apply, only OK (camera close/open) will change them.
OK will write parameters to the ini file given at the status line and will close the dialog. Afterwards the camera will be closed and reopened, with the new parameters.
Cancel will forget all modifications done while dialog was open, including any of the Apply commands.
Favourites will alternatively display all or just the selected group of parameters. Parameters can be selected by clicking left of their name where a small star will appear, or via context menu.
Load will ask for a ini file name and load parameters from that file. Make sure it is a correct ini file. Best if it is a previously saved ini file, or a default ini file.
Save will ask for a file name and write current set of parameters there. This way a copy of parameters can be made to a separate file, where only this camera, on this particular port will have its data written.
Sample parameterset for monochrome cameras
Below is a sample set of parameters from USB monochrome camera. Other cameras will have similar parameters.
General
Property |
Description |
|---|---|
DrvVersion |
Current version of this driver.
|
Device Control
Property |
Description |
|---|---|
DeviceScanType |
Scan type of the sensor. |
DeviceVendorName |
the name of the manufacturer |
DeviceModelName |
Model name of the device |
DeviceManufacturerInfo |
additional manufacturer specific information. |
DeviceVersion |
Version of the device. |
DeviceFirmwareVersion |
Version of the firmware in the device. |
DeviceSerialNumber |
Device serial number. |
DeviceUserID |
User Defined Name. |
MaximumDeviceResponseTime |
Maximum response time in ms. |
DeviceManifestTableAddress |
Address of the Manifest Table. |
DeviceSBRMAddress |
Address of the Technology Specific Bootstrap Register Map. |
DeviceTimestamp |
Current device time in ns. |
DeviceTimestampIncrement |
Timestamp increment in ns/tick. |
DeviceProtocolEndianess |
Endianess of the protocol implementation. |
DeviceImplementationEndianess |
Endianess of the device implementation. |
DeviceUptime |
Time of Device boot. |
DeviceConnectionStatus |
Indicates the status of the specified Connection. |
DeviceCommandTimeout |
Indicates the command timeout of the specified Link. |
DeviceTemperatureSelector |
Selects the location within the device, where the temperature will be measured. |
DeviceTemperature |
Device temperature in degrees Celcius (C). |
DeviceMaxThroughput |
Indicates max data in bits from the camera each second. |
Image Format Control
Property |
Description |
|---|---|
WidthMax |
Maximum width of the image (in pixels). |
HeightMax |
Maximum height of the image (in pixels). |
RegionSelector |
Selects the Region of interest to control. |
Width |
Width of the image provided by the device (in pixels). |
Height |
Height of the image provided by the device (in pixels). |
OffsetX |
Vertical offset from the origin to the AOI (in pixels). |
OffsetY |
Horizontal offset from the origin to the AOI (in pixels). |
ReverseX |
Flip horizontally the image sent by the device. |
PixelFormat |
Format of the pixel data. |
PixelSize |
Size of a pixel in bits. |
TestPatternGeneratorSelector |
Selects which test pattern generator is controlled by the TestPattern feature. |
TestPattern |
Selects the type of test pattern that is generated by the device as image source. |
DecimationHorizontal |
Horizontal sub-sampling of the image. |
DecimationVertical |
Vertical sub-sampling of the image. |
FrameSpecInfoSelector |
Selects the frame-specific information. |
FrameSpecInfo |
the frame-specific information. |
Acquisition Control
Property |
Description |
|---|---|
AcquisitionBurstFrameCount |
Number of frames to acquire for each FrameBurstStart trigger. |
AcquisitionFrameRate |
Controls the acquisition rate at which the frames are captured. |
AcquisitionFrameRateEnable |
Enables manual control of the camera frame rate. |
ResultingFrameRate |
Indicates the maximum allowed frame acquisition rate (in fps) given the current AOI, exposure and bandwidth |
TriggerSelector |
Selects the type of trigger to configure. |
TriggerMode |
Controls whether or not the selected trigger is active. |
TriggerSource |
Specifies the internal signal or physical input line to use as the trigger source. |
TriggerDelay |
Specifies the delay (in us) to apply after the trigger reception before activating it. |
TriggerCacheEnable |
Specifies whether or not the Trigger Cache is enabled. |
ExposureMode |
Sets the operation mode of the Exposure (or shutter). |
ExposureTime |
Exposure time in us when Exposure Mode is Timed. |
ExposureAuto |
Sets the automatic exposure mode when Exposure Mode is Timed. |
AutoExposureTimeLowerLimit |
Lower limit of the Auto Exposure Time parameter |
AutoExposureTimeUpperLimit |
Upper limit of the Auto Exposure Time parameter |
Analog Control
Property |
Description |
|---|---|
Gain |
Gain applied to the image in dB |
GainAuto |
Sets the automatic gain control (AGC) mode. |
AutoGainLowerLimit |
Lower limit of the Auto Gain parameter |
AutoGainUpperLimit |
Upper limit of the Auto Gain parameter |
DigitalShift |
Sets the value of the selected digital shift control |
DigitalShiftEnable |
Enables/disables DigitalShift adjustment. |
Brightness |
Sets the value of the selected Brightness control |
BlackLevel |
Analog black level in percent. |
BlackLevelEnable |
Enables/disables black level adjustment. |
Gamma |
Controls the gamma correction of pixel intensity. |
GammaSelector |
|
GammaEnable |
Enables/disables gamma correction. |
AutoFunctionAOISelector |
Selects the Auto Function AOI. |
AutoFunctionAOIWidth |
Sets the width of the auto function area of interest in pixels |
AutoFunctionAOIHeight |
Sets the height of the auto function area of interest in pixels |
AutoFunctionAOIOffsetX |
Sets the starting column of the auto function area of interest in pixels |
AutoFunctionAOIOffsetY |
Sets the starting line of the auto function area of interest in pixels |
AutoFunctionAOIUsageIntensity |
Digital IO Control
Property |
Description |
|---|---|
Line0_LineMode |
Controls whether the physical Line is used to Input or Output a signal. |
Line0_LineStatus |
Returns the current status of the selected input or output Line. |
Line0_LineStatusAll |
Returns the current status of all available Line signals at time of polling in a single bitfield. |
Line0_LineDebouncerTime |
Sets the value of the selected line debouncer time in us. |
Line1_LineMode |
Same as Line0 |
Line1_LineInverter |
Controls the inversion of the signal of the selected or output line. |
Line1_LineStatus |
Same as Line0 |
Line1_LineStatusAll |
Same as Line0 |
Line1_LineSource |
Selects which internal acquisition or I/O source signal to output on the selected line. |
Line1_StrobeEnable |
Enables the strobe signal to be output to the selected line. |
Line1_StrobeLineDuration |
Sets the value of the selected Strobe Line Duration in us. |
Line1_StrobeLineDelay |
Sets the value of the selected Strobe Line Delay in us. |
Line1_StrobeLinePreDelay |
Sets the value of the selected Strobe Line PreDelay in us. |
Line2_LineMode |
Same as Line0 |
Line2_LineStatus |
Same as Line0 |
Line2_LineStatusAll |
Same as Line0 |
Line2_LineDebouncerTime |
Same as Line0 |
Counter And Timer Control
Property |
Description |
|---|---|
CounterSelector |
Selects which Counter to configure. |
CounterEventSource |
Select the events that will be the source to increment the Counter. |
CounterResetSource |
Selects the signals that will be the source to reset the Counter. |
CounterValue |
Reads or writes the current value of the selected Counter. |
CounterCurrentValue |
Reads the value of the selected Counter. |
Transport Layer Control
Property |
Description |
|---|---|
PayloadSize |
Number of bytes transferred for each image or chunk on the stream channel. |
GenCPVersionMajor |
Major version of the specification. |
GenCPVersionMinor |
Minor version of the specification. |
U3VVersionMajor |
Major version of USB3 Vision. |
U3VVersionMinor |
Minor version of USB3 Vision. |
U3VCPSIRMAvailable |
Set if the device supports at least one device streaming interface. |
U3VCPEIRMAvailable |
Set if the device supports at least one device event interface. |
U3VCPIIDC2Available |
Set if the device supports IIDC2 register map. |
U3VMaxCommandTransferLength |
Specifies the maximum supported command length of the device in bytes. |
U3VMaxAcknowledgeTransferLength |
Specifies the maximum supported acknowledge length of the device in bytes. |
U3VNumberOfStreamChannels |
Specifies the number of Stream Channels. 0, if no stream channel is supported |
U3VSIRMAddress |
Address of the first Streaming Interface Register Map. |
U3VSIRMLength |
Specifies the length of each SIRM. |
U3VCurrentSpeed |
Specifies the current speed of the USB link. |
Stream Control
Property |
Description |
|---|---|
U3VSIPayloadTransferSize |
the size of regular payload bulk transfers. |
U3VSIPayloadTransferCount |
the number of regular payload data bulk transfers. |
U3VSIPayloadFinalTransfer1Size |
the size of the Final Transfer 1 payload bulk transfer. |
U3VSIPayloadFinalTransfer2Size |
the size of the Final Transfer 2 payload bulk transfer. |
Ini file management
Ini file contains camera parameters that will be applied to the camera when it is opened. These parameters will be displayed in Camera Configuration Dialog.
One ini file can contain settings for several cameras.
Ini file can be saved or loaded explicitly. An alternative file in a different location can be used, if necessary.
Internal structure of ini file
Ini file is a standard Windows ini file. With [sections] and name=value for parameters.
Settings for each camera will go under separate sections. Section names are made after port number, assigned to the camera. Thus it is possible to have the same camera with different settings, under different ports, and switch back and forth quickly. Camera model is written in each section, it allows only cameras of the same model to reuse existing settings.
If different camera is asigned to the port, all previous settings are ignored at first, and later they will be overwritten with the new camera’s settings.
Default and Alternative ini files
Default ini file is hvgrab.ini, it is located in ~profile/hardware folder. Normally it will be used for loading and saving.
An alternative ini file can be specified by using python script. The subsequent Load or Save will use this new ini file.
Note
Although it can be done at any time, in order to use certain settings, like Width or Height, the alternative ini file must be specified before camera open.
To specify an alternative ini file before camera open:
activate BeforeCameraOpen event in Scorpion Actions
put a script there:
GetCamera("0").executeCmd('set', 'IniFile=path_and_name_of_alternative_ini_file')
Loading and Saving of ini file
The normal flow of events is this:
The ini file is read when camera is opening.
The settings are then applied to the camera.
If ini file is not available, some default settings are assigned to the camera.
If user later opens Camera Configuration dialog, and closes it with OK, the new or updated settings will be written into the ini file, to be used on the next camera open.
Alternatively, it is possible to explicitly save camera settings at any time, by using python script. All active settings will be written into ini file. The same or different file can be used. The save command will write settings of the specified camera only, under the section made from the port number.
Camera settings can also be loaded from a file (reloaded or imported from different location). The file must contain a section that is named after the same port the camera is using. After Ini file loading or importing settings will be applied to the camera, except for Width, Height, etc.
Note: all specified folders (relative or absolute) must exist.
Examples of setting ini file name
cam= GetCamera("0")

# set alternative ini file
cam.executeCmd('set', 'IniFile=c:\hw\alt.ini')   # absolute path to a new location
cam.executeCmd('set', 'IniFile=backup.ini')      # a file in default location ~profile/hardware
cam.executeCmd('set', 'IniFile=bck\hvgrab.ini')  # relative path : ~profile/hardware/bck/hvgrab.ini

# reset to default ini file
cam.executeCmd('set', 'IniFile=')
cam.executeCmd('set', 'IniFile=DefaultIniFile')
Query active and default ini files
cam= GetCamera("0")

#find out name of the default ini file
nameOfDefaultFile = cam.executeCmd('get', 'DefaultIniFile')  # returns 'hvgrab.ini'

#find out name of the active ini file
nameOfActiveFile  = cam.executeCmd('get', 'ActiveIniFile')   #
#    returns 'hvgrab.ini' or alternative, if set prior to this
Examples of saving
cam= GetCamera("0")
cam.executeCmd('save', '' )                  # save settings to the active inifile
cam.executeCmd('save', 'ActiveIniFile' )     # save settings to the active inifile
cam.executeCmd('save', 'DefaultIniFile' )    # save to the default (hvgrab.ini in ~profile/hardware)
cam.executeCmd('save', full_path_and_name)   # save settings to the specified file
cam.executeCmd('save', rel_path_and_name)    # save settings to the file under ~profile/hardware
Examples of loading or importing
cam= GetCamera("0")
cam.executeCmd('load', '' )                  # load settings from the active inifile
cam.executeCmd('load', 'ActiveIniFile' )     # load settings from the active inifile
cam.executeCmd('load', 'DefaultIniFile' )    # load settings from the default inifile
cam.executeCmd('load', full_path_and_name)   # load settings from the specified file
cam.executeCmd('load', rel_path_and_name)    # load settings from the file under ~profile/hardware
Color Correction
Color Correction Matrix
Some cameras support Color Correction for the grabbed images. The parameters will be provided in a separate ColorTransformationControl section, if available.
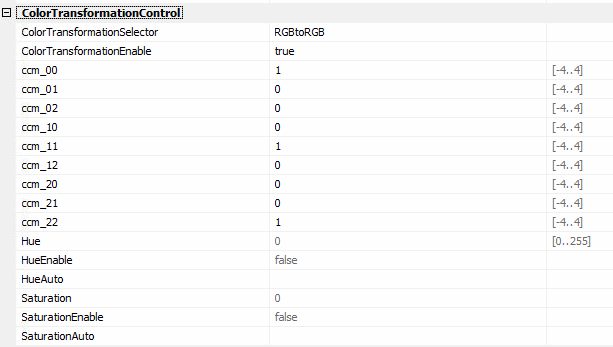
Either Color Transformation Matrix (CCM) or Hue/Saturation can be used for color correction, but not both at the same time.
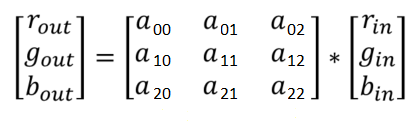
If CCM is active, it is applied by the formula, for each point of the image:
Note
ColorTransformationEnable parameter is reversed compared to what is provided by MVS (suspected bug in MVS v3.4).
Bayer Color Conversion
Some cameras (e.g. CU series) provide only 8bit Bayer encoded color stream, which has to be converted into 24bit color.
Please note, Bayer 8bit stream has monochrome flags, therefore driver will output monochrome images for CU cameras, by default. Use ForceColorMode parameter to explicitly specify color output.
To enhance the default conversion to color the following parameters can be used from ImageFormatControl section:
Parameter |
Description |
|---|---|
UseBayerGamma |
Enable BayerGamma parameter |
BayerGamma |
Gamma value for Bayer8/10/12/16 -> RGB24 conversion, range 0.1 .. 4.0 |
UseBayerCvtQuality |
Enable BayerCvtQuality parameter |
BayerCvtQuality |
Set the bell interpolation quality parameter for Bayer8/10/12/16 -> RGB24 conversion: 0-Fast 1-Equilibrium 2-Optimal |
UseBayerMatrix |
Enable BayerMatrixScale and BayerMatrixRow0/1/2 parameters |
BayerMatrixScale |
Quantitative scale of color correction matrix. Values of integer power of 2, up to 65536 |
BayerMatrixRow0 |
3x3 Color correction matrix elements. Values: -65536 .. +65536. Each row must contain 3 integers, e.g. ‘1 0 0’ |
BayerMatrixRow1 |
see above |
BayerMatrixRow2 |
see above |
Note
The parameters above are set only once immediately after camera open, therefore they are not available from python script.
Note
For CU cameras please set ForceColorMode parameter from General section to color.
Frame statistics
In order to troubleshoot image acquisition the driver provides MVS camera stats:
FrameNumber
FrameDevTimeStampHigh
FrameDevTimeStampLow
FrameHostTimeStamp
FrameSecondCount
FrameCycleCount
FrameCycleOffset
FrameTriggerIndex
FrameLostPacket
cam= GetCamera("0")

print "Current frame num=", cam.executeCmd('get', 'FrameNumber')

high=cam.executeCmd('get', 'FrameDevTimeStampHigh')
low= cam.executeCmd('get', 'FrameDevTimeStampLow')
print "Current timestamp=",high, ".", low
Note
After image is passed to Scorpion, the driver clears the buffer (makes it black). This excludes repeating images fom the driver. Use frame stats to troubleshoot any problems with missing or delayed images.
Continous or SingleFrame mode
There are three parameters to consider:
continous grab mode in Scorpion:
cam= GetCamera("0")

#start continous mode
cam.setProperty('continous', 1)

#stop continous mode
cam.setProperty('continous', 0)
This feature is present in all Scorpion versions. It instructs camera to send all available images (either triggered or via freerun) to Scorpion.
If not in continous mode, each image needs to be requested (via Snapshot or ‘Grab’ command).
AcquisitionMode camera parameter.
Possible values are SingleFrame or Continuous.
To get one or more frames the camera must start acquisition, and stop it aftewards. SingleFrame gets just one image in between start/stop acquisition. Continuous is the opposite - many images after acquisition is started.
Starting and stopping acquisition gives an overhead. It is undesirable in faster framerates. If camera runs in Continuous and Scorpion is not, the unrequested images will be dropped, consuming the bandwith and distorting frame counters. Also, if camera has relatively low fps there may be a delay for the next image - depending on Scorpion’s framerate.
To mitigate this :
run both Scorpion and camera in Continuous
use triggers (or software triggers) for image acquisition. Triggers can be used with Continuous mode too.
SyncContinousMode camera parameter from the General section.
If true, this will set camera’s AcquisitionMode according to Scorpion continuous mode:
When Scorpion enters continous, the AcquisitionMode is set to continuous too.
When Scorpion leaves continous, the AcquisitionMode is set to SingleFrame.
Note
Usage suggestions:
Continuous mode gives the minimum overhead and it must be used when the goal is to achieve high or maximum fps.
If frame stats are used, the camera must not issue non requested images: it must be SingleFrame or triggered. Or both camera and Scorpion in continuous mode.
Using SyncContinousMode = true may be a good shortcut in most cases.
Heartbeat and Camera Reconnect
Since version 1.0.4.48 (see release notes) hvgrab driver supports automatic camera reconnect in cases when network connection is lost but restored later.
Parameters to set up:
- GevGVCPHeartbeatDisable (TransportLayerControl):
Set this to False to enable connection monitoring.
- GevHeartbeatTimeout (TransportLayerControl):
Adjust heartbeat timeout (in milliseconds). Default is 3000ms. When camera connection is lost for a longer duration than this, the camera generates a connection loss message and camera reconnect attemts are started (see below).
- ReconnectOnLoss (General):
Enable camera reconnect attempts when heartbeat timeout disconnects the camera. Default is True.
- ReconnectTryCount (General):
Number of attempts to reopen the camera when connection is lost. Default is 0, which means infinite retry count.
- ReconnectWaitSeconds (General):
Period in seconds to wait before attempting next reopen. This a float value, i.e. it can be fractional. Default is 10s.
Note
Monitor Scorpion console messages from camera. Connection loss, reconnect attempts and succeful reconnect are printed in the log.
Note
When connection is lost, it may not get reflected on Camera icon, since grabbing is paused/ignored when connection loss is registered. However if/when camera is reconnected the grabbing resumes.
Action Command
Action command is a camera image trigger over tcp/ip by PTP protocol.
Note
Not all cameras support Action Command. Look for Action Control section in camera settings.
First set up ActionDeviceKey, ActionGroupMask and ActionGroupKey parameters in Action Control section.
Then issue a python command ActionCommand with parameters.
Parameter |
Default value |
Description |
|---|---|---|
key |
1 |
Corresponds to ActionDeviceKey from camera settings |
group |
1 |
Corresponds to ActionGroupKey from camera settings |
groupmask |
1 |
Corresponds to ActionGroupMask from camera settings |
ip |
255.255.255.255 |
Target address - send to all cameras. To send to a particular subnet only, use e.g. 169.254.255.255 for subnet 169.254.0.0/255.255.0.0. Or specify exact IP address. |
time |
0 |
Command delay. Current cameras do not support other than 0. |
If default value is used, the parameter can be omitted.
An example of usage:
cam= GetCamera("0")

#send Action command to all reachable cameras. Use default parameters.
cam.executeCmd('set', 'ActionCommand')

#send Action command to all reachable cameras with key=2
cam.executeCmd('set', 'ActionCommand={ key=2 }

#send Action command to a given subnet, key=2, group/mask are default values (=1)
cam.executeCmd('set','ActionCommand= {key=2; ip=169.254.255.255}')
Note
Monitor camera console for ActionCommand error messages.
Possible error messages in case of failure:
Command is not supported by the device
The device is not synchronized to a master clock to be used as time reference
A device queue or packet data has overflowed
The requested scheduled action command was requested at a time that is already past
Setting properties using Python
All camera properties available in configuration dialog can also be accessed by using Python.
In addition, camera register values can be set or retrieved, thus allowing access to full camera configuration. Register number as string is presented instead of property name and is prefixed with 0x. Register numbers can be found in camera documentation.
With setProperty/getProperty only long values can be accessed. Use executeCmd to set values of any type.
Property names are not case sensitive.
Setting width/height properties
cam= GetCamera("0")

#set width
cam.executeCmd('set', 'width=1600')

# print image height
print 'height=', cam.executeCmd('get', 'height')
Setting camera TriggerMode properties
cam= GetCamera("0")
# toggle hw trigger on off
cam.executeCmd('set','TriggerMode=On')   # enables trigger mode
cam.executeCmd('set','TriggerMode=Off')   # disable trigger mode
Setting camera TriggerSource using executeCmd
cam= GetCamera("0")
# change trigger source. 'Line0' - get value from selection dropbox in config dialog
cam.executeCmd('set','TriggerSource=Line0')

# change trigger source. 'Software' - get value from selection dropbox in config dialog
cam.executeCmd('set','TriggerSource=Software')

# change trigger mode. 'ON'|'OFF' - get value from selection dropbox in config dialog
cam.executeCmd('set','TriggerMode=OFF')
Setting camera AquisitionMode - SingleFrame stops aquisition
cam= GetCamera("0")

# start image aquisition - not in SoftwareTrigger or SoftwareTrigger mode
cam.executeCmd('set','AcquisitionMode=Continuous')
print cam.executeCmd('get','AcquisitionMode')

# stop image aquisition
cam.executeCmd('set','AcquisitionMode=SingleFrame')
print cam.executeCmd('get','AcquisitionMode')
Python only properties
Some properties are available only via python script. Some properties are actually commands.
Cmd |
Parameter |
Description |
|---|---|---|
get/set |
LogDebugView |
output level to DbgView, [0..3] |
get/set |
LogLevel |
output level to Scorpion console |
get/set |
Continous |
boolean (1 or 0), video stream continuous mode, passing all frames to Scorpion regardless of grab command |
set |
Reset or DeviceReset |
performs camera reset, see note below |
set |
FeatureSave |
invoke MVS API function MV_CC_FeatureSave. Will write into a file given as an argument to executeCmd. File will be located in ‘Hardware’ folder |
set |
FeatureLoad |
invoke MVS API function MV_CC_FeatureLoad. |
set |
UserSetLoad |
load previously saved parameter set from camera (0..3). This is as provided by camera functionality. |
set |
UserSetSave |
save current parameter set into camera (0..3). This is as provided by camera functionality. |
set |
UserSetDefault |
change current camera default parameter set. As provided by camera. |
set |
SoftwareTrigger |
execute software trigger |
set |
ActionCommand |
Trigger cameras by PTP protocol, see Action command description. |
get |
FrameNumber |
Current frame number |
get |
FrameDevTimeStampHigh |
Frame timestamp high 32 bits |
get |
FrameDevTimeStampLow |
Frame timestamp low 32 bits |
get |
FrameHostTimeStamp |
Frame Host-generated timestamp |
get |
FrameSecondCount |
Frame second count |
get |
FrameCycleCount |
Frame cycle count |
get |
FrameCycleOffset |
Frame offset of Cycle |
get |
FrameTriggerIndex |
Frame trigger counting |
get |
FrameLostPacket |
Frame lost packet number for this frame |
set |
IniFile |
specify ini file to be used as the main ini file. The default will not be used. Must be called before camera open. |
get |
ActiveIniFile |
get currently used ini file path, see Ini File Management |
get |
DefaultIniFile |
get default ini file path, see Ini File Management |
save |
ini file name or empty |
save to a new or default ini, see Ini File Management |
load |
ini file name or empty |
load from ini file, see Ini File Management |
Camera DeviceReset
cam= GetCamera("0")
#device reset, see note below
cam.executeCmd('set','DeviceReset=1')   # value 1 or any other is not import here
Note
Device Reset may take a long time on some of the HvGrab cameras. While relatively quick on USB cameras, on some GigE cameras may take up to several minutes.
Set camera parameters Before Camera Open
cam= GetCamera("0")
#Use alternative ini file. Must be called before camera open
cam.executeCmd('set', 'IniFile=v:/common/dark.ini')
print "The default ini file is", cam.executeCmd('get', 'DefaultIniFile')
print "The active ini file is", cam.executeCmd('get', 'ActiveIniFile')
Export and Import Camera parameters to file
#Export or import parameters
GetCamera('0').executeCmd('set', 'ExportIni=c:/data/exported.ini')
GetCamera('0').executeCmd('set', 'ImportIni=v:/common/tester.ini')